# Automated Reporting
This documentation is being updated.
Full documentation of DDB-Hotdocs. This service enables the development of Word templates capable of receiving data directly from DDB.
Note for external users - many of the links in the following section refer to internal applications. Please speak to your project team for support.
# Prerequisites
Install HotDocs Author (opens new window)
- Note : The cost displayed on the Arup App store is indicative of software costs. There is no direct charge to the user.
Get a HotDocs license
You will need a license to post your template to the HotDocs server and link it to DDB. Submit a Service Now request with the description "Request Hotdocs License for use with DDB" through DDB Service Now (opens new window)
Note: a license is only necessary to perform the final link of the template to DDB. You can work on your template as soon as HotDocs is downloaded even without a license.
Complete the Digital Design Brief Moodle Course (opens new window)
- An understanding of the basic principles of DDB's data structure (Asset Hierarchy) will be necessary to develop templates.
HotDocs Moodle Course (opens new window)
- This is optional for additional context.
Download the latest
ddbComponent-master.cmpfile.
Contact [email protected] to receive the latest file.
# Step-by-step guide
# Set-up
Open HotDocs Author
Specify a location for your HotDocs Workspace. Note this must be on your local
C://drive. You cannot open and edit templates stored in the cloud.
Now you are ready to build your template.
# Creating a template
Top tip: You can create a template from an existing document! Start with an example version of the report you wish to automate.
Open your example report in Word and navigate to the
HotDocsribbon tab.Click
Create TemplateIn the pop-up window, fill out the template name and complete.
You should now see the Hotdocs Field Editor appear in a right-hand pane.
# Designing the template
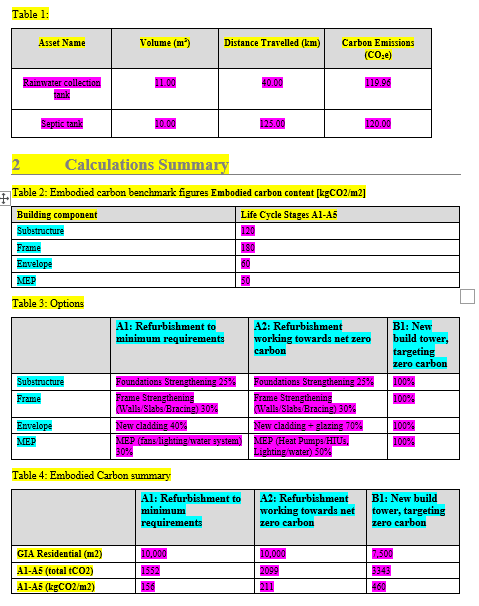
Before you start to build your template using the Field Editor, work through your example report with a highlighter and identify the following:
- Static elements: Items like blocks of text, headings, images that we want to see every time the template is used.
- Dynamic elements: Items we wish to replace with data stored in DDB. These are typically items likely to vary from project to project. For example: - Numerical values in a design criteria table - Project-specific information e.g. Client name, Building name, Project location.
- Conditional elements: Specific sentences, clauses, paragraphs, sections, images that may be static, but we may only include them in the report if a certain criteria is met. For example: - I want to include 'this table' if the project is at Design Stage 4 or beyond. - I want to include 'this paragraph', but only if the project is located in Scotland.
# Building the template
Note - For this section, you will need the latest version of the DDB Master Component File. See Prerequisites for details.
# Link the master component file
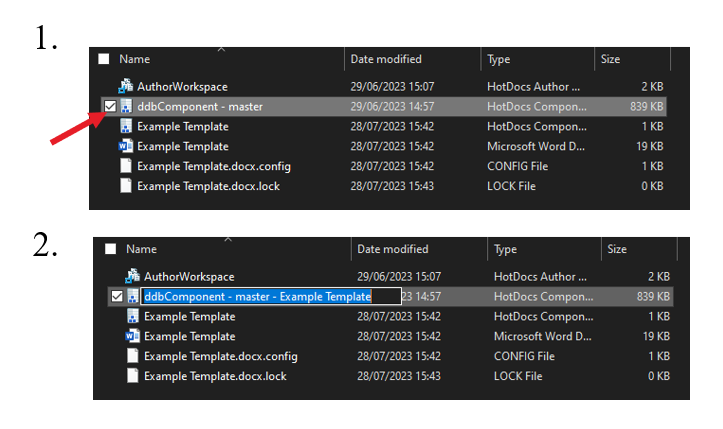
Navigate to your HotDocs workspace in your file explorer and paste a copy of the latest ddbComponent-master.cmp file. Rename the file and append your template name.
Open your HotDocs workspace, click on your template and select Template Properties. Update the component file to the new ddbComponent-master-Your_Template.cmp file.
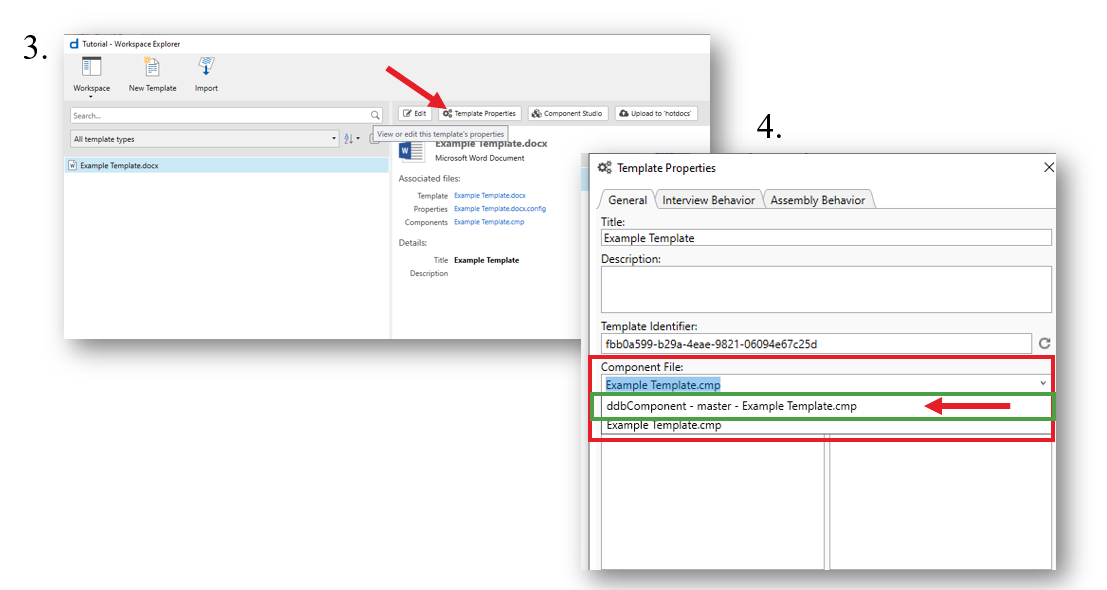
You will now have all of the latest DDB parameters and asset types preloaded into your template!
# Working with DDB parameters | Placeholders
# Inserting the parameter value
We use HotDocs Placeholder variables to identify fields to be replaced with DDB parameter values. You can insert placeholder variables into your template using the Field Editor.
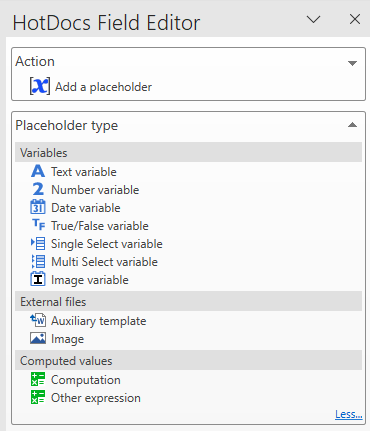
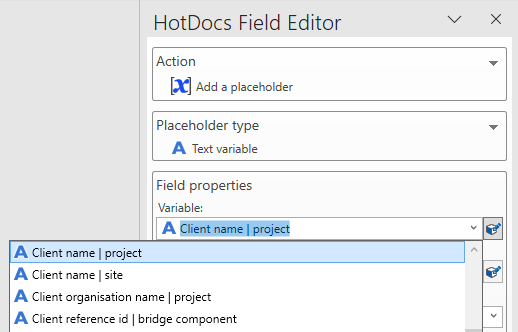
Selecting one of the variable types will display a drop-down list of all DDB items of this data type available for use. You can begin typing a parameter name to filter the search. Be sure to select the parameter with the correct asset type, as it is common to find parameters available for use against multiple asset types in DDB.
For example, Client name is available at both project and site level, if you are referring to the project client, be sure to select the former as shown below.
# Inserting the parameter units
We can access some additional parameter metadata using specific placeholder suffixes. To pull in the units for a parameter, you can manually append units to the parameter placeholder name. This is particularly useful if you use different units to quantify a parameter between projects or report versions (e.g. metric vs imperial). It is generally good practice to use this feature, as it will ensure the parameter always reflects its assigned value in DDB.
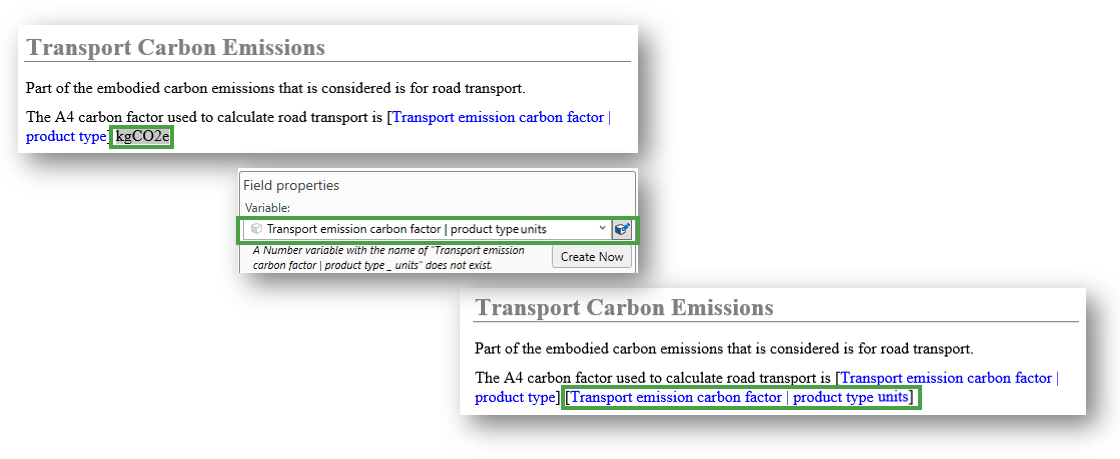
Be sure to make all edits to fields through the Field Editor and not in the fields themselves.
# Inserting the parameter source
We can access parameter source information the same way as parameter units. Appending source will render key source information.
# Working with DDB assets | Repeated Regions
# Repeat Table
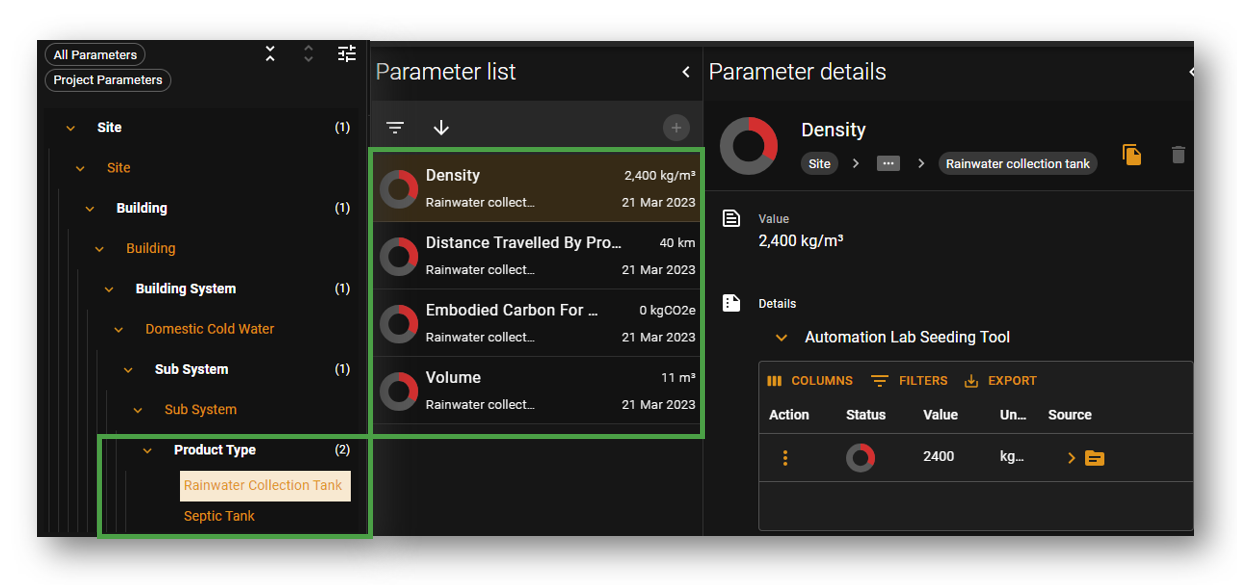
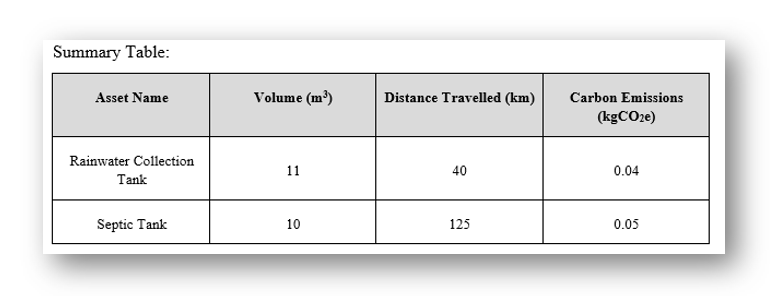
We often want to report parameters in the context of the DDB asset they are describing. To do this, we need to point the template to the correct branch of the asset hierarchy. In the below example, we want to report some embodied carbon parameters for DDB assets in the product type branch of the hierarchy. In our DDB project, we have two product types, each with parameters to be included a table.
In our template, we insert our parameter placeholders as before. In this case, we also want to report the name of the assets too. To do this, we insert a text variable placeholder matching the name of our asset type: product type.
Note: asset placeholders must be entirely lower case.
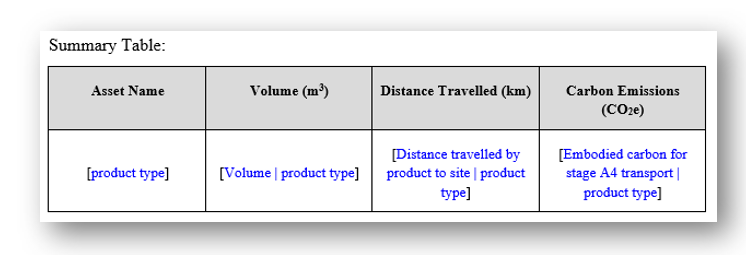
Now, we insert a repeated region. To do this, we highlight the extent of the table row to be repeated (including the final column boundary), and create a repeated dialog placeholder as shown.
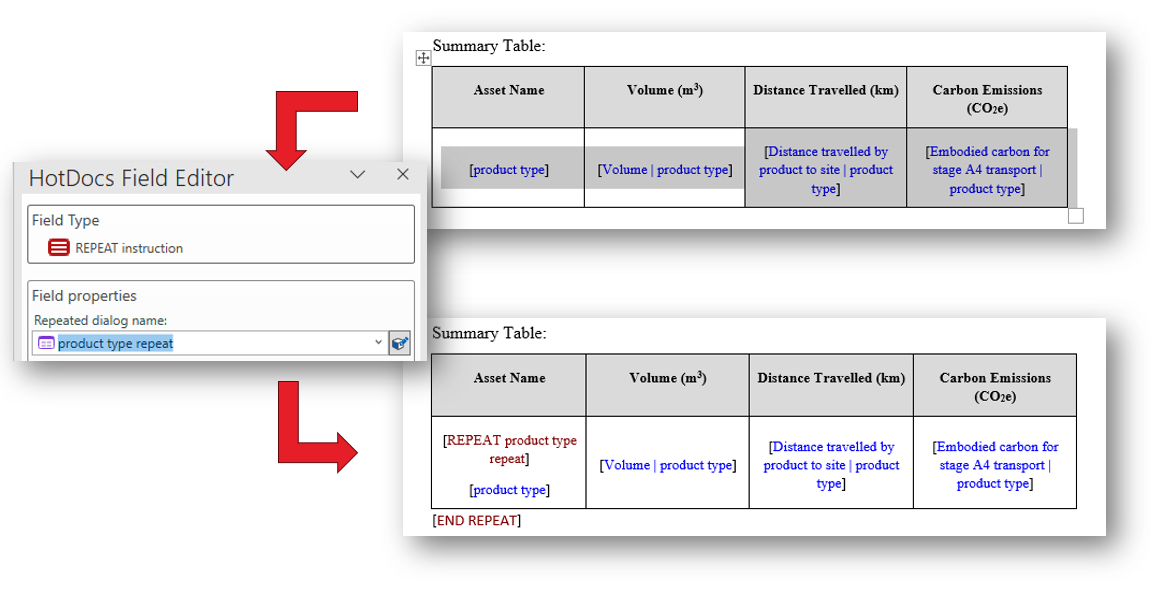
Note: the name of the repeated dialog must be of the form <asset type> repeat.
The final step is to ensure the contents of the repeat table are linked to the repeated dialog. We can do this by clicking on each field and linking the placeholders to the dialog in the Field editor as shown.
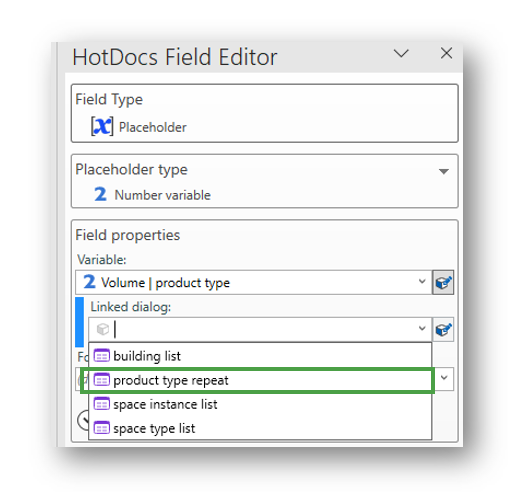
If we were to run this template with our example project, we would get the following result:
Top tip: While we can only apply a repeat region within a table to a single row as shown above, we can apply a repeated region to many other report elements. For example, a line of a numerical list, an entire page, or a section of a report.
# Filter Computation
We may want to apply more strict criteria to our repeat regions. For example, here I want to produce a bullet point list of space type assets, but I only want to pull in the DDB space types that have mechanical ventilation. Or, more specifically, space types for which the DDB true/false parameter Mechanical ventilation required is TRUE.
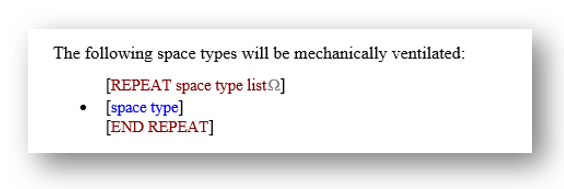
In the HotDocs tab, open the Component Studio and create a new Computation variable of result type True/False.
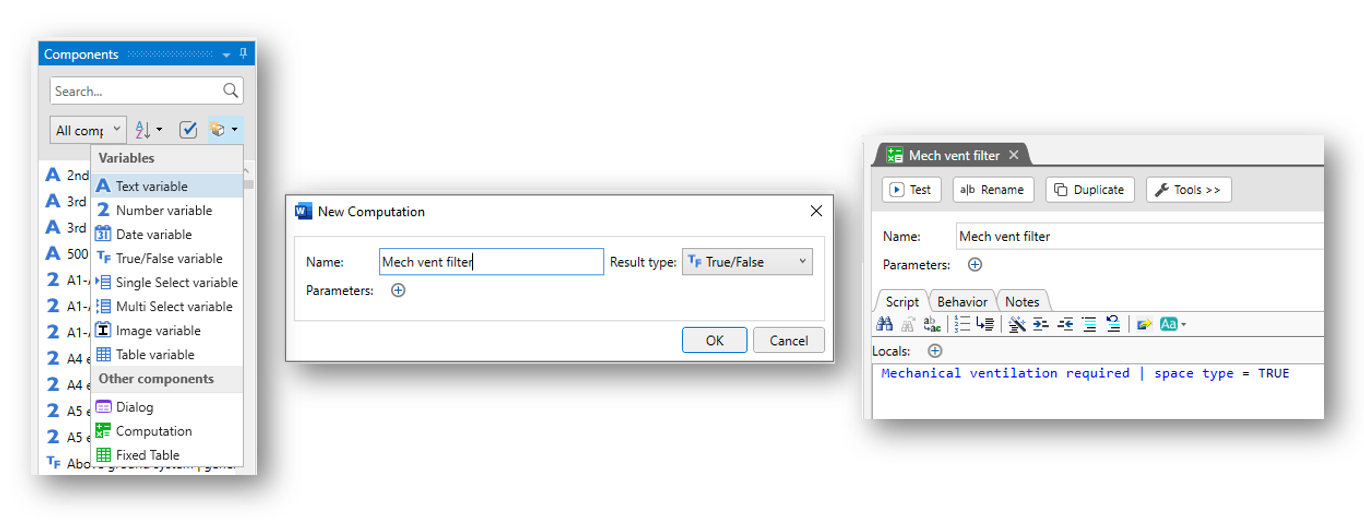
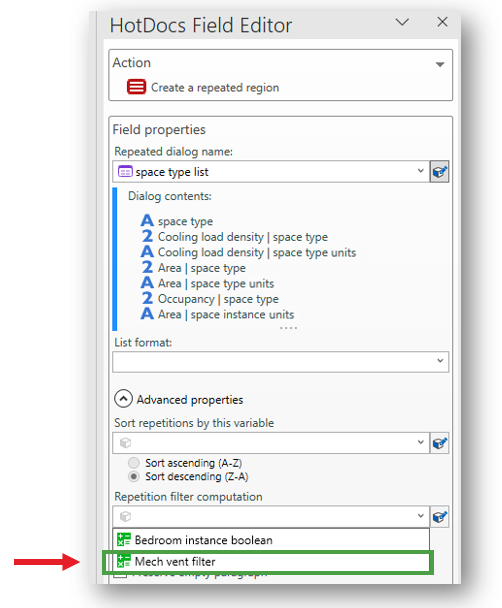
Going back to our repeat region, click on it and apply a Repetition filter computation in the Field editor Advanced properties drop-down.
# Testing your template
You can use the Test feature to open the interview sheet and manually test the functionality of your template offline before going through the activation process. This feature is useful to test the formatting of the rendered output, and the interview sheet also provides further visualisation of the structure of your variables and repeat dialogs.

# Activating your template
Before you can send DDB data to your template, it will need to be serialised and made available on the server. Send your template to a DDB team member at [email protected] to have them carry out this procedure.
# Generating your report
Now your template is active, you will be able to print reports from the DDB Document Service.
This section is being developed